I’m a big fan of Laravel. I use it in most of my personal and professional projects, and for the most part it really does make coding fun for me again. One of the things Laravel tries to do (similar to Rails) is to build in the most repetitive things a developer would have to do, for example a user registration/login/forgotten password system. In modern times, most apps big enough to require a framework need some way for users to sign up, login and reset their password. Laravel makes this stupidly easy, as long as you’re sticking to the way they want you to do it. It’s actually pretty easy even if you need to inject some custom authentication stuff in there, it’s just not very well documented, which is why I’m writing this post.
In each of my current Laravel apps, auth works just a tiny bit differently. Add to that the fact that a few of them were pulled forward from Laravel version 4.2, and things can get confusing and messy. (It should be noted that I’m writing this post as much for me as I am for you, so that the next time I have to do this, I have everything documented and it won’t take me forever.)
In Snipe-IT (my free open source IT asset management system), for example, we don’t offer social login, but we do have LDAP/Active Directory login information (and we’ll likely be adding Google Apps for Business integration) so I needed to customize *some* parts of the auth, but really didn’t feel like having to write a custom password reset system just because I needed to extend the actual login part. For AnyShare, we have social login (extending Laravel’s Socialite, so that each user can have multiple social networks tied to their user account).
Laravel makes this really, really easy – they just don’t document how to do it very well.
(Note: The examples in this article are for Laravel 5.3, but the concepts are valid for 5.1+ as well. Some of the method names may have changed, but that’s it.)
If you look at the Laravel documentation, it tells you that you can generate the routes for authentication using php artisan make:auth. If you’ve got a brand new app with nothing crazy going on, run that command, run migrations, and you’re pretty much all set. The appropriate auth database tables, views, controllers, and routes get magically inserted into your code. Yay!
If you need a weird hybrid of those things, it can be a little harder to parse out where to start, since the Auth::routes(); bit that Laravel adds into your routes/web.php file is magical, in that no actual controllers, methods, or request URLs defined. It’s just Auth::routes();. This means figuring out where to override all or some of them can be confusing. What if you want to put your views in a different location than the default ones they generate? What if you want to use most of the built-in logic, but want to tweak it a little beyond just modifying the blades that were generated for you? It’s not at all hard, but it can be confusing.
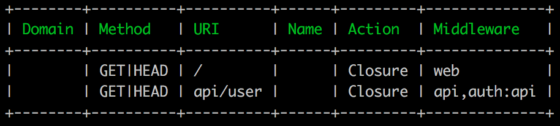
If you run php artisan route:list after generating your auth files, you can see the new auth routes that Laravel has created for you.
Before running php artisan make:auth in a brand new app:
After running php artisan make:auth: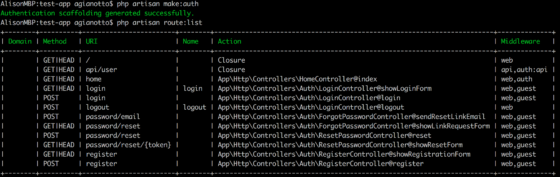
If you’ve been following along, you’ll have already noticed that these routes are pointing to controller methods that don’t actually exist in the Auth controllers files that Laravel created for you. Go ahead and open up your Auth/LoginController.php, and you’ll see something like this:
<?php

namespace App\Http\Controllers\Auth;

use App\Http\Controllers\Controller;
use Illuminate\Foundation\Auth\AuthenticatesUsers;

class LoginController extends Controller
{
/*
|--------------------------------------------------------------------------
| Login Controller
|--------------------------------------------------------------------------
|
| This controller handles authenticating users for the application and
| redirecting them to your home screen. The controller uses a trait
| to conveniently provide its functionality to your applications.
|
*/

use AuthenticatesUsers;

/**
* Where to redirect users after login.
*
* @var string
*/
protected $redirectTo = '/home';

/**
* Create a new controller instance.
*
* @return void
*/
    public function __construct()
    {
       $this->middleware('guest', ['except' => 'logout']);
    }
}
If you want to change anything about how login works, it can be confusing to figure out where you need to do that, since the login stuff Laravel generated for you is clearly working, but there aren’t any actual controller methods here to modify.
But notice a few things in this file, specifically use Illuminate\Foundation\Auth\AuthenticatesUsers; and use AuthenticatesUsers;.
Same goes for ForgotPasswordController.php, which looks like this:
<?php

namespace App\Http\Controllers\Auth;

use App\Http\Controllers\Controller;
use Illuminate\Foundation\Auth\SendsPasswordResetEmails;

class ForgotPasswordController extends Controller
{
/*
|--------------------------------------------------------------------------
| Password Reset Controller
|--------------------------------------------------------------------------
|
| This controller is responsible for handling password reset emails and
| includes a trait which assists in sending these notifications from
| your application to your users. Feel free to explore this trait.
|
*/

use SendsPasswordResetEmails;

    /**
    * Create a new controller instance.
    *
    * @return void
    */
    public function __construct()
    {
        $this->middleware('guest');
    }
}
Like in the LoginController, there isn’t a lot of logic in this file, but we use Illuminate\Foundation\Auth\SendsPasswordResetEmails; and use SendsPasswordResetEmails;, which tells the controller to use the built-in Laravel trait called SendsPasswordResetEmails that lives in Illuminate\Foundation\Auth\SendsPasswordResetEmails.php;.
The key is to check out the files in vendor/laravel/framework/src/Illuminate/Foundation/Auth. You’ll see several files in this directory that are named things like AuthenticatesUsers.php, and SendsPasswordResetEmails.php. These are the traits you use in your Auth controllers. If you don’t specify them in your controllers, the default methods in the traits kick in, and you don’t really have to do much. If, however, you want to override some or all of the auth stuff, you’ll add methods of the same name to the corresponding controller.
Let’s take a look at the SendsPasswordResetEmails trait in vendor/laravel/framework/Illuminate/Foundation/Auth/SendsPasswordResetEmails .php:
<?php

namespace Illuminate\Foundation\Auth;

use Illuminate\Http\Request;
use Illuminate\Support\Facades\Password;

trait SendsPasswordResetEmails
{
    /**
    * Display the form to request a password reset link.
    *
    * @return \Illuminate\Http\Response
    */
    public function showLinkRequestForm()
    {
        return view('auth.passwords.email');
    }

    /**
    * Send a reset link to the given user.
    *
    * @param \Illuminate\Http\Request $request
    * @return \Illuminate\Http\RedirectResponse
    */
    public function sendResetLinkEmail(Request $request)
    {

    $this->validate($request, ['email' => 'required|email']);

    // We will send the password reset link to this user. Once we have attempted
    // to send the link, we will examine the response then see the message we
    // need to show to the user. Finally, we'll send out a proper response.
    $response = $this->broker()->sendResetLink(
        $request->only('email')
    );

    if ($response === Password::RESET_LINK_SENT) {
        return back()->with('status', trans($response));
    }

    // If an error was returned by the password broker, we will get this message
    // translated so we can notify a user of the problem. We'll redirect back
    // to where the users came from so they can attempt this process again.
    return back()->withErrors(
    ['email' => trans($response)]
    );
    }

    /**
    * Get the broker to be used during password reset.
    *
    * @return \Illuminate\Contracts\Auth\PasswordBroker
    */
    public function broker()
    {
        return Password::broker();
    }
}
These may look crazy overhwhelming if you’re not used to poking around at the guts of Laravel, but it’s actually pretty straightforward.
Let’s say I wanted to customize my forgotten password actions a little. I want to add a log entry every time someone clicks on the forgotten password link. That would be a really weird thing to do, but it’s a simple example for our purposes, since all that built-in Laravel trait does is return a view.
You’ll remember from the routes that were created that the generated route for the forgotten password request form is a GET route to App\Http\Controllers\Auth\ForgotPasswordController@showLinkRequestForm, but that (of course) doesn’t exist in the controller itself.
It does exist in the trait though. Remember from the SendsPasswordResetEmails trait in vendor/laravel/framework/Illuminate/Foundation/Auth::
/**
* Display the form to request a password reset link.
*
* @return \Illuminate\Http\Response
*/
public function showLinkRequestForm()
{
    return view('auth.passwords.email');
}
...
We never, ever want to edit code within the vendors directory. Ever. Any time you do a composer update, those changes will be blown out, and you’ll hate your life. Plus, it’s common to not check the vendors directory into version control, so you’d lose those changes for good. I cannot possibly stress this part enough.
Instead, we open up the app/Http/Controllers/Auth/ForgotPasswordController.php file that Laravel generated for us when we ran php artisan make:auth, and add something like this:
<?php
/**
* Display the form to request a password reset link.
*
* @return \Illuminate\Http\Response
*/
public function showLinkRequestForm()
{
    Log::debug('a user has clicked on the forgotten password link');
    return view('auth.passwords.email');
}

/**
* Display the form to request a password reset link.
*
* @return \Illuminate\Http\Response
*/
public function showLinkRequestForm()
{
    Log::debug('a user has clicked on the forgotten password link');
    return view('auth.passwords.email');
}
(If you wanted to really do this, remember to add use Log; at the top of the file.)
Now when a user clicks on the “Forgot password” link on the login page, I can see in my storage/logs/laravel.log file:
[2016-11-18 21:12:54] local.DEBUG: a user has clicked on the forgotten password link
That’s all very well and good, but we’ve now duplicated some code from the trait, which we probably don’t want to do. It’s tempting then to try something like:
/**
* Display the form to request a password reset link.
*
* @return \Illuminate\Http\Response
*/
public function showLinkRequestForm()
{
    Log::debug('a user has clicked on the forgotten password link');
    parent::showLinkRequestForm();
}
But that won’t work. 🙁 As Simon Hamp explains very well in his excellent Why and how to override Laravel’s built-in auth controller methods post (which I wish I had found a long time ago):
Traits don’t exist in the same inheritance stack as extended classes — they’re more like class partials and any number of them can be combined within a class. In that context, it’s better to not think of it as inheritance, but more as appropriation; we’re appropriating the methods in the trait and placing them in the context of the class that uses them. So they’re not “inherited”; they exist as part of the definition of the class that uses them.
So to implement this, we would change the use SendsPasswordResetEmails; bit at the top of your ForgotPasswordController.php to something like this:
use SendsPasswordResetEmails {
    showLinkRequestForm as showForgottenPasswordForm;
}
And then update the method we want to override like this:
**
* Display the form to request a password reset link.
*
* @return \Illuminate\Http\Response
*/
public function showLinkRequestForm()
{
    Log::debug('a user has clicked on the forgotten password link');
    return $this->showForgottenPasswordForm();
}
Now I’ve still got the original trait magic that displays the view, but I’ve extended the functionality to suit my own needs. You can do this with just about anything in Laravel that uses traits, not just auth methods.
This got a little longer than I had wanted it to be, but I wanted to walk through the process of understanding how traits work, and show you how to approach them in a way that will help you all throughout Laravel, not just in the magical Auth stuff. I do wish Laravel’s documentation made this a little clearer – you really do need to go digging around in the framework code to sort some of it out – but just follow the path in your vendors directory, and you should be able to find the methods to override or extend.